
저번 포스트까지 TypeScript로 Hello World를 출력하는 프로그램을 작성해보고 컴파일, 번들링을 진행해서 브라우저에서 실행하는 부분까지 실습을 해보았습니다. 이번 포스트에서는 Naver 검색 API를 호출하는 부분의 소스코드를 변경하여 TypeScript 기반으로 작성해 보겠습니다.
이번에도 동일하게 Naver Open API를 사용해 보겠습니다. Naver API는 아래 URL에서 신청하시면 됩니다.
https://developers.naver.com/products/service-api/search/search.md
검색 - SERVICE-API
검색 NAVER Developers - 검색 API 소개 웹, 뉴스, 블로그 등 분야별 네이버 검색 결과를 웹 서비스 또는 모바일 앱에서 바로 보여 줄 수 있습니다. 또한 ’OO역맛집’과 같은 지역 검색을 할 수도 있으
developers.naver.com
Naver 검색 API는 아래와 같은 형식으로 데이터를 응답합니다. (아래는 뉴스 API 입니다.)
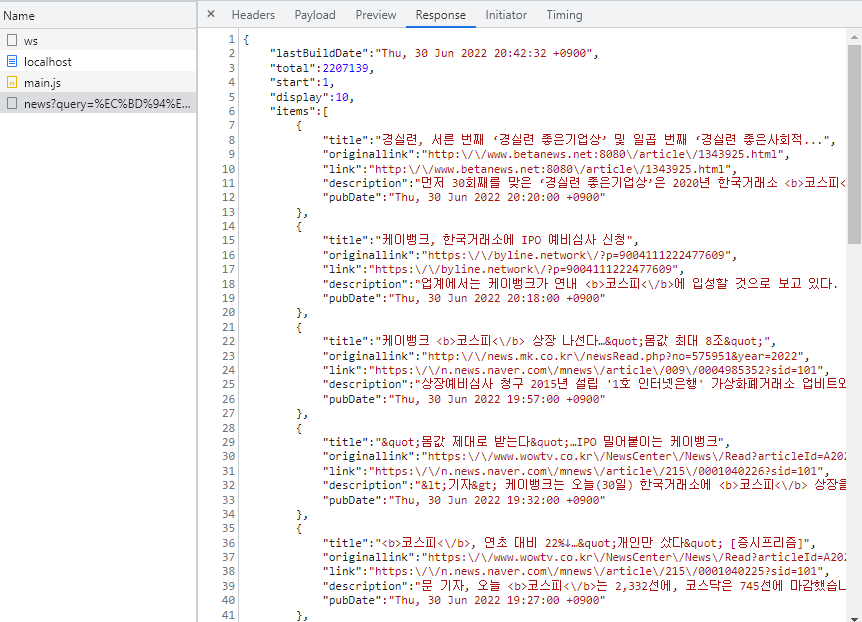
정리하면 뉴스 검색 API, 도서 검색 API는 아래와 같은 형식이며 items 항목에 각자의 레이아웃으로 데이터를 응답합니다.
{
    lastBuildDate: '',
    total: 0,
    start: 0,
    display: 0,
    items: []
}
items 항목에는 뉴스, 도서 구분에 따라 아래와 같은 데이터를 응답니다.
[뉴스 API 데이터]
{
    title: '',
    originallink: '',
    link: '',
    description: '',
    pubDate: ''
}
[도서 API 데이터]
{
    title: '',
    link: '',
    image: '',
    author: '',
    price: '',
    discount: '',
    publisher: '',
    pubdate: '',
    isbn: '',
    description: ''
}
TypeScript는 각 변수의 데이터와 목적에 맞는 데이터 타입을 선언해야 합니다. 데이터 타입은 interface를 사용해서 선언하겠습니다. /src/interface 라는 경로를 생성하고 apidata.interface.ts 파일을 생성합니다.
먼저 뉴스 API에 대한 데이터 타입을 선언합니다. 뉴스 API의 응답 데이터는 모두 문자 형태이므로 string 으로 선언합니다.
interface INewsData {
    title: string;
    originallink: string;
    link: string;
    description: string;
    pubDate: string;
}
다음 도서 API에 대한 데이터 타입을 선언합니다. 뉴스 API 마찬가지로 모두 문자 형태이므로 string 으로 선언합니다.
interface IBookData {
    title: string;
    link: string;
    image: string;
    author: string;
    price: string;
    discount: string;
    publisher: string;
    pubdate: string;
    isbn: string;
    description: string;
}
마지막으로 뉴스 API와 도서 API가 공통으로 사용하는 응답을 IHttpResp 라는 이름으로 선언합니다. 건수를 나타내는 항목의 데이터 유형은 number로 선언하고, items 항목은 뉴스나 도서 데이터를 목록 형태로 응답하므로 각 데이터의 배열을 or(|) 기호로 연결하여 작성합니다.
그리고 Naver API 응답부에는 없었던 type이라는 변수를 하나 추가합니다. 우리는 뉴스 데이터와 도서 데이터를 모두 IHttpResp 라는 형태로 수신하는데, 현재 인터페이스의 응답이 어떤 API에 대한 응답인지를 식별할 필요가 있습니다. interface가 아니라 class로 생성해서 사용한다면 resp instanceof IHttpResp 같은 형태로 식별이 가능하겠지만 우리는 단순히 데이터의 타입만 정의했으므로 instanceof 로는 현재 데이터가 뉴스 데이터인지, 도서 데이터인지 식별이 불가능합니다.
interface IHttpResp {
    lastBuildDate: string;
    total: number;
    start: number;
    display: number;
    type: string;
    items: INewsData[] | IBookData[];
}
배열 요소는 []로 선언해도 되고, 아래와 같이 Array로 선언할 수도 있습니다.
items: Array<INewsData> | Array<IBookData>;
마지막으로 3가지 유형의 interface를 export 합니다.
export {
    IHttpResp,
    INewsData,
    IBookData
}
apidata.interface.ts 파일의 전체 소스코드는 아래와 같습니다.
interface IHttpResp {
    lastBuildDate: string;
    total: number;
    start: number;
    display: number;
    type: string;
    items: INewsData[] | IBookData[];
}

interface INewsData {
    title: string;
    originallink: string;
    link: string;
    description: string;
    pubDate: string;
}

interface IBookData {
    title: string;
    link: string;
    image: string;
    author: string;
    price: string;
    discount: string;
    publisher: string;
    pubdate: string;
    isbn: string;
    description: string;
}

export {
    IHttpResp,
    INewsData,
    IBookData
}
다음은 React와 마찬가지로 /src/component 경로를 생성하고 listview.component.tsx 파일을 생성합니다. 먼저 ListView 컴포넌트를 생성하고 useState Hook으로 상태를 선언하고 초기 값은 null로 설정합니다. React만 사용해서 개발할 때는 articles, setArticles 튜플에 대한 데이터 타입은 선언하지 않았으나 TypeScript 기반으로 개발하므로 데이터 타입을 선언합니다. 전체 데이터를 의미하는 IHttpResp를 사용하며 초기에는 빈 값이므로 null로 허용하고, 초기 값은 null로 선언합니다.
import { useEffect, useState } from "react";
import { IBookData, IHttpResp, INewsData } from "../interface/apidata.interface";

const ListView = () => {
    const [articles, setArticles] = useState<IHttpResp | null>(null);
}

export default ListView;
목록에 필요한 데이터는 Naver API를 호출해서 받아와야 하므로 React로 개발할 때와 동일하게 fetch API를 사용하여 Naver API를 GET 방식으로 호출하는 apiGet이라는 이름의 함수를 하나 정의합니다.
const apiGet = async(type: string, param: string) => {
    const apiUrl: string = 'https://openapi.naver.com/v1/search/' + type + '?query=' + param;
    await fetch(apiUrl, {
        method: 'GET',
        headers: {
            'Content-Type': 'application/json',
            'X-Naver-Client-Id': CLIENT_ID,
            'X-Naver-Client-Secret': CLIENT_SECRET
        }
    })
    .then((resp: Response) => resp.json())
    .then((resp: IHttpResp) => {
        const typedResp: IHttpResp = {
            ...resp,
            type: type
        }
        setArticles(typedResp);
    });
};
각 변수의 데이터 타입을 선언합니다. fetch API의 결과는 then()을 통해 Response 타입으로 받을 수 있으며, Response의 json() API를 통해 Response body를 추출할 수 있습니다. 이렇게 추출한 응답부는 위에서 선언한 IHttpResp 형태가 됩니다.
받아온 IHttpResp 데이터를 setArticles로 상태를 저장할 때 type 속성을 추가해서 상태를 저장합니다. ...resp 같은 형태를 spread 구문 (전개 구문)이라고 하며, 아래 MDN 링크를 참고하시면 됩니다.
https://developer.mozilla.org/ko/docs/Web/JavaScript/Reference/Operators/Spread_syntax
전개 구문 - JavaScript | MDN
전개 구문을 사용하면 배열이나 문자열과 같이 반복 가능한 문자를 0개 이상의 인수 (함수로 호출할 경우) 또는 요소 (배열 리터럴의 경우)로 확장하여, 0개 이상의 키-값의 쌍으로 객체로 확장시
developer.mozilla.org
이제 useEffect를 추가하여 apiGet 함수로 뉴스 검색을 호출합니다. 코로나가 다시 2만명 대가 되어서 걱정이네요. "코로나" 키워드로 검색해 보겠습니다.
useEffect(() => {
    apiGet('news', '코로나');
}, []);
이번 포스트에서는 UI 부분까지는 진행하지 않을 예정이므로 Rendering 하는 부분은 그냥 <ul> 태그를 하나 추가만 해놓고, 다음 포스트에서 데이터를 바인드 해보겠습니다.
return (
    <div className="listArea">
        <ul className="listView">

        </ul>
    </div>
);
현재까지 진행한 listview.component.tsx 파일의 전체 소스코드는 아래와 같습니다.
import { useEffect, useState } from "react";
import { IBookData, IHttpResp, INewsData } from "../interface/apidata.interface";

const ListView = () => {
    const [articles, setArticles] = useState<IHttpResp| null>(null);

    const apiGet = async(type: string, param: string): Promise<void> => {
        const apiUrl: string = 'https://openapi.naver.com/v1/search/' + type + '?query=' + param;
        await fetch(apiUrl, {
            method: 'GET',
            headers: {
                'Content-Type': 'application/json',
                'X-Naver-Client-Id': CLIENT_ID,
                'X-Naver-Client-Secret': CLIENT_SECRET
            }
        })
        .then((resp: Response) => resp.json())
        .then((resp: IHttpResp) => {
            const typedResp: IHttpResp = {
                ...resp,
                type: type
            }
            setArticles(typedResp);
        });
    };

    useEffect(() => {
        apiGet('news', '코로나');
    }, []);

    return (
        <div className="listArea">
            <ul className="listView">

            </ul>
        </div>
    );
};

export default ListView;
소스코드 작성을 마치셨으면 컴파일과 번들링을 수행합니다.
D:\workspace\searchNaverApiTs>tsc
D:\workspace\searchNaverApiTs>npm run build
프로젝트를 기동합니다.
D:\workspace\searchNaverApiTs>yarn start
실행을 위한 환경 설정은 지난 포스트에서 모두 마쳤으니 한 번 실행해 보겠습니다. Local 데몬에서 Naver API를 호출하는 방식이니 Chrome 브라우저의 CORS 차단을 해제하고 실행해야 합니다. 관련된 내용은 이전 아래 포스트를 참고해주세요.
React 기초 (목록 만들기) 04 - API 호출
저번 포스트에서는 간단하게 "Hello World"를 출력하는 프로그램을 작성하고 실행시켜서 확인해 보았습니다. 이번 포스트에서는 현재 과정의 주 목적인 ListView를 구성하기 위해 Naver News API를 호출
redballs.tistory.com
잘 따라하셨다면 아래와 같이 Network 탭에 인터페이스 이력을 확인할 수 있습니다.
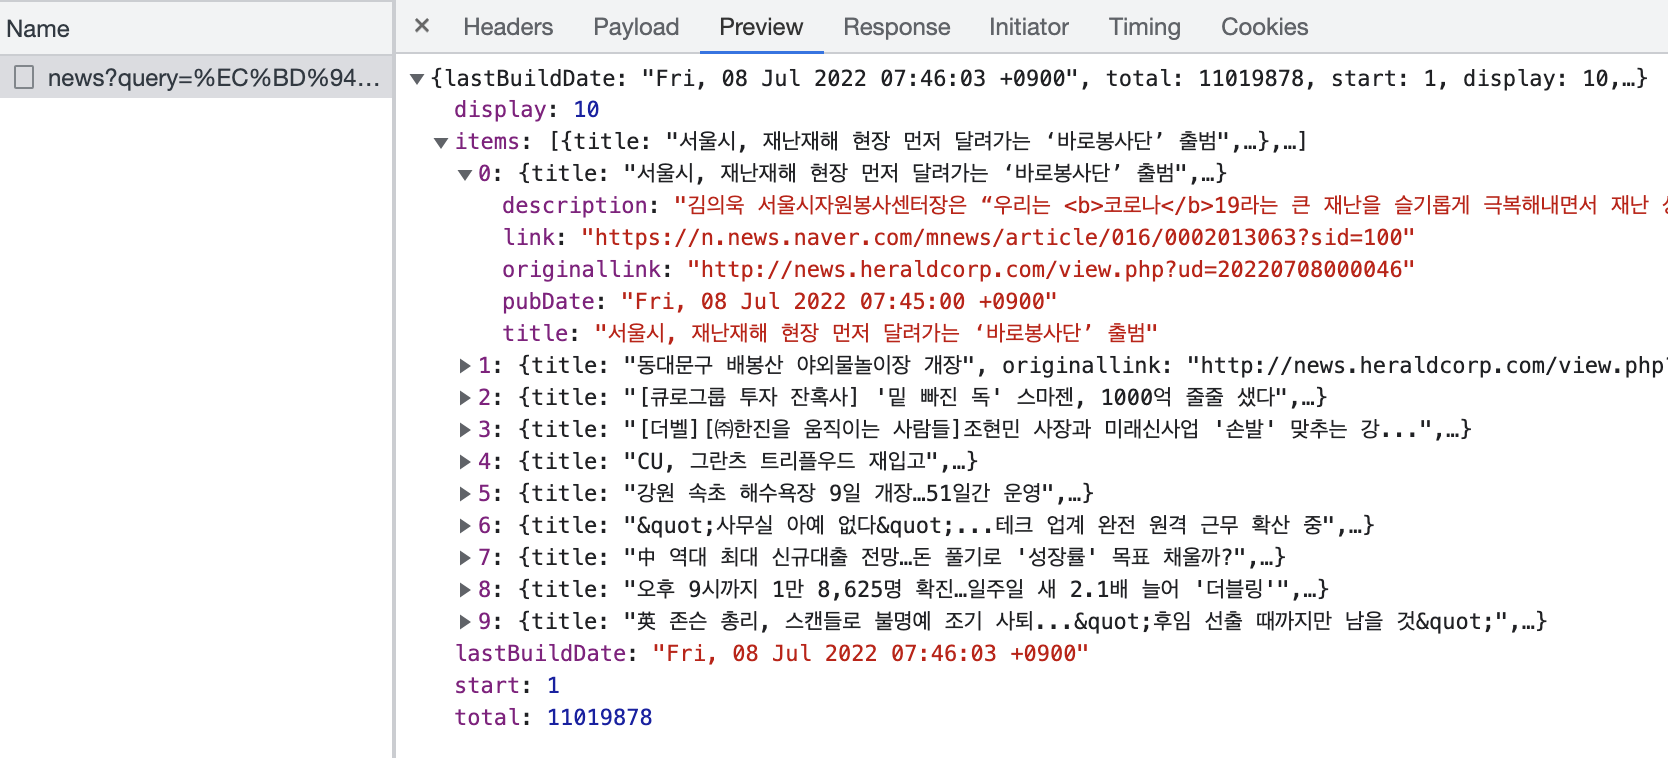
저번 포스트와 동일한 내용을 TypeScript 기반으로 변경하여 API 인터페이스까지 진행해 보았습니다. 다음 포스트에서는 인터페이스한 데이터를 목록에 바인드해서 목록 UI 구성을 마무리 해보겠습니다.
'React > React 기초 (List - TypeScript)' 카테고리의 다른 글
| React 기초 (목록 - TypeScript) 07 - Tab 버튼 구현(#1) (0) | 2022.07.08 |
|---|---|
| React 기초 (목록 - TypeScript) 06 - ListView UI 구성 (0) | 2022.07.08 |
| React 기초 (목록 - TypeScript) 04 - Hello World (0) | 2022.07.06 |
| React 기초 (목록 - TypeScript) 03 - 컴파일 (0) | 2022.07.05 |
| React 기초 (목록 - TypeScript) 02 - 프로젝트 생성 (0) | 2022.07.04 |